

Offering your services through the Internet requires a special setup to secure your servers. In this tutorial we will discuss the standard setup for the DMZ (demilitarized zone) using webmethods components.
This tutorial will cover the following points:
- The components to build Demilitrlalized-zone.
- Configuring the ‘Enterprise gateway’
- Configuring the ‘Internal server'(internal IS)
The components which will be used in building the DMZ are:
Firewall: is a network component used to allow/deny the network traffic using a set of rules.
WebMethods Enterprise gateway: is an integration server placed in the DMZ , it handles the communication between the external callers and the internal IS which will fulfill the request from inside the company’s network.
Internal IS: is the the integration server which is the point of contact between the enterprise gateway in the DMZ and the internal network.
Figure 1 : DMZ implementation

As we see in figure 1:
- The area between the two firewalls is the DMZ (demilitarized-zone). The servers in this area don’t include business logic or data, and have access to the internal server(internal IS).
- The enterprise gateway will be in the demilitarized-zone between two firewalls. It is responsible for forwarding the request to the internal IS, and validate the credentials of the users.
- On the network side we must apply the ‘natting’ technique which is mapping the IP of the server to another one when going outside the company’s network(to the Internet) to hide the IP from Internet users or hackers.
- Firewall-1 will block all the traffic received except the traffic received to the port of the enterprise gateway.
- Firewall-2 will block all the traffic expect the traffic between the enterprise gateway and the internal server.
- The internal IS will automatically establish permanent connections with the enterprise gateway to be used in the communication. The advantage of this approach is that the connections between the DMZ (demilitarized-zone) and the internal company’s network will be initiated from the internal network by the internal server which reduce the security risks by limiting the access of the DMZ to the internal network.
Configuring the ‘Enterprise gateway’
In this section we will go through configuring the enterprise gateway, which is an Integration server with a special configuration. It was introduced in webMethods for the first time in version 8 under the name of ‘reverse http gateway’.
Here are the step to convert an integration server to Enterprise gateway:
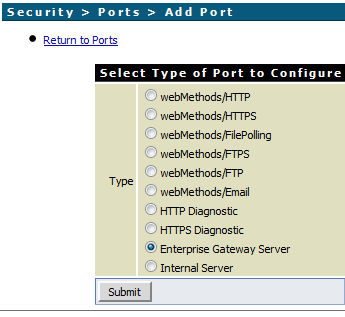
- From the Integration server administrator page choose ‘security > add port’.
- Choose ‘enterprise gateway server’ as the port type, and click on ‘submit’. Note: in version 8.x the enterprise gateway was called ‘reverse http gateway server’.
3. After clicking the ‘submit’ button we will see the page in the below image:

Enterprise gateways external port:
- ‘Enable’: possible values are ‘yes’ which means that the port will be enabled automatically after saving the configuration, or ‘No’ which means that you have to enable the port manually to activate the external port of the enterprise gateway.
- Protocol: depending on the nature of the service, choose the protocol type http, or https. Note: using http or https decision has nothing to do with using DMZ decision, https will require configuring a security certificate. To be able to decide which protocol to use please check our ‘secured connection’ tutorial.
- Port: the communication port between the users’s devices/browsers and the enterprise gateway. You have to configure firewall-1 to allow the traffic to this port.
- Alias: is the port alias, and it must be unique on the level of the port aliases in the integration server. Ex: ExternalPort555.
- Package name: the package which the port will be associated to it. Please leave the defaul value ‘wmRoot’ to make sure that the port is available as long as the integration server is up.
- Client authentication: possible values are 1)user/password users have to provide their credentials to access the service, 2) digest, 3)request client certificate: if the customer doesn’t represent the certificate the gateway will use the user/password, 4) require client certificate: if the customer doesn’t represent the security certificate the request will be rejected.
Enterprise gateways registeration port:
- ‘Enable’: The same above explanation as the port external port settings.
- Protocol: The same above explanation as the external port settings.
- Port: is the port to be available for the communication between the enterprise gateway and the internal IS. You have to allow the traffic from the internal IS to this port in firewall-2 access rules.
- Package: The same above explanation as the external port settings. The value must match the value of pacakge field in the external port settings.
- Client authentication: The same above explanation as the port external port settings.
4. Click on ‘save changes’ button after finalizing your configuration.
Configuring the ‘Internal server'(internal IS)
- From the Integration server administrator page choose ‘security > add port’.
- Chose ‘Internal server’ as the port type, and click on ‘submit’.
- After clicking the ‘submit’ button we will see the page in the below image.

Internal server configuration:
- Enable: choose ‘yes’ if you want to enable the port automatically after saving the settings, and choose ‘no’ if you want to enable it later manually from IS admin > security >ports.
- Protocol: choose http or https depending on the nature of your service as we stated earlier in this tutorial.
- Pacakge name: the pacakge which the port will be associated with it. Please keep the default value ‘wmRoot’.
- Alias: the unique alias of the port on the level of the IS as explained earlier.
- Enterprise gateway server: the host and port of the enterprise gateway to establish the permanent connection which will be used in the communication between the enterprise gateway and the internal server.
- Client authentication: the same options explained earlier in the enterprise gateway configuration.
4. After finalizing the configuration click ‘save changes’ button.
Now our infrastructure is ready to receive requests from the Internet.
Thank you for visiting our website. We are looking forward reading your comments and questions.
Follow us:
on twitter: @WM_Expert
Group on LinkedIn: webmethodsExpert.com
(C) 2015 Hossam Elsharkawy. All rights reserved.

Hi,
as I see new ports are created by number off connection. how can i specify the ports that i want.
Not use dynamic port?
Thanks
I am regular visitor, how are you everybody? This piece of writing posted at this
site is truly good.
thank you
very useful information.
thanks
shafeeque
webMethods integration developer from Saudi Arabia
Happy to know that you find it useful!
Thank you,
Hossam
Hi,
Thank you.
For the outbound messages , are they passed to the gateway ? or it needs a proxy server configuration ?
Hi Aïcha,
The outbound communication can be passed through the proxy. The gateway is for the inbound communications only.
Thank you!
Hossam
Thank you Hossam for your reply.
For outbound communication, we have set a proxy server in the IS setting.
Do we have to do any further configuration ?