

What is webMethods BPM?
The conflict between the business and technology people is one of the major challenges that affect the company performance and limit its abilities to reach its goals.
WebMethods BPM will allow you to develop your business process in a graphical way which will facilitate the communication between business and technology people. Business people will jump on-board and particiapte in the design phase which will increase the chance of designing superior products.
This article will be one of a series to uncover how to develop and optimize a process with webMethods BPM.
Note : All the information in this article is based on webMethods version 8, however the same knowledge might be applicable for later versions.
In this article we will cover the following points :
- The advantages of using webmethods BPM.
- How to decide to use the BPM or not?
- Webmthods BPM Getting started.
- Prepare and configure the designer.
- Create a new business process.
- Available componenets/steps in webmethods BPM.
- Design your first BPM.
- Conclusion.
1 The advantages of using webMethods BPM
- Visualize the bussiness process, which will make it easier for the business people to particiapte to make sure that you are building the rigth process.
- You can use webMethods Optimize for process, to see how your business is doing, the Service level agreement (SLA), failure rate, process bottlenecks).
- Visualize the status of a specific request (process instance), and what are the executed steps.
- Resubmitting failed request/process from any step in the business process.
2 How to decide to use the BPM or not?
BPM processes are consuming a lot of hardware resources, so depnding on the nature of your project we will decide to use it or not.
SoftwareAG designer enable two modes for the desiging the process :
- Business analyst : can only draw/design the sequence of the process steps to represent the business process from the business prespective.
- Process Developer : avail more options to transform the design done by the business analyst to real business process capable of processing the business request.
If you have a project which involves a lot of steps and interacting with many systems then the BPM might be very helpful to see the statistics, resubmit from a specific point, facilitate the communication between the IT and business, … etc. But if your project is small which involves 1 or 2 steps then it is better to save the resources for something else and use the regular flow services, triggers, schedulers, … etc to develop your project.
3 WebMethods BPM Getting Started
In this section we will start our way to build our first webmethods Business Process Model. So in this section when we say BPM we mean business process model NOT business process management.
3.1 Prepare And configure the SoftwareAG Designer
- We will use ‘SoftwareAG Designer’ to develop our webMethods business process model.
- Define the Integration server you are going to use as follows :
- Go the the menu Windows –> Preferences.
- Expand the item SoftwareAG in the list at left side of the preference window.
- Choose ‘Integration Server’.
- Edit the configuration of the ‘default’ server, and press ‘Ok’ to save the configuration.

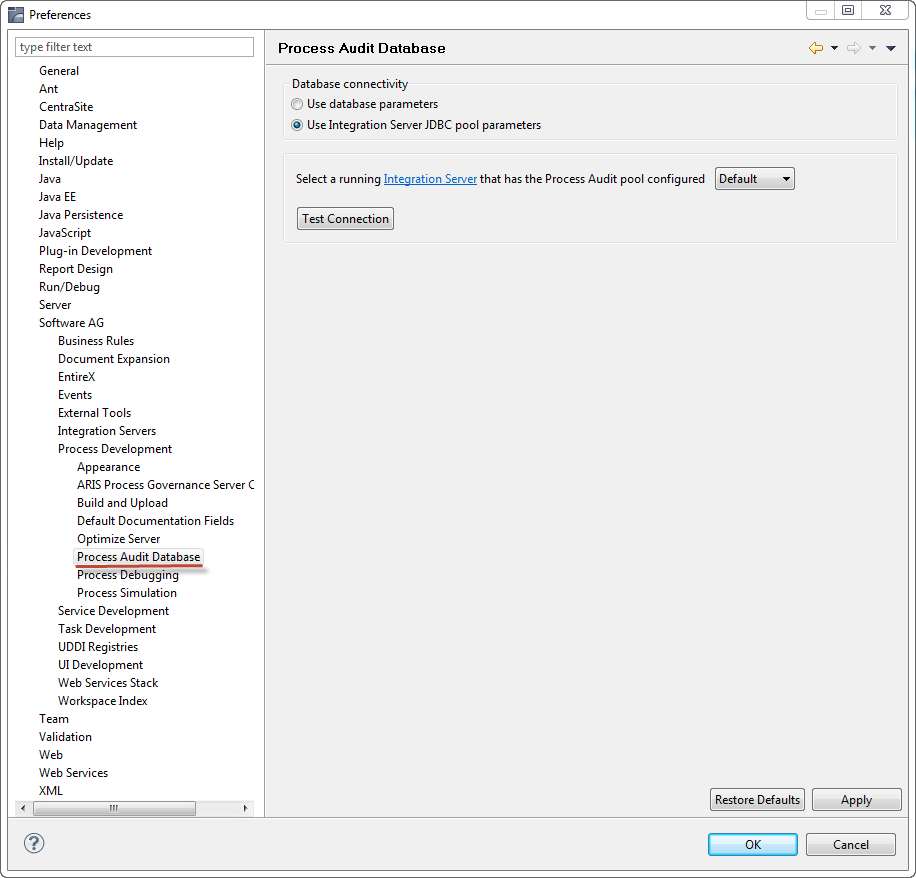
- In the preferences window –> Software AG –> Process development –> Process Audit database, choose ‘Use Integration Server JDBC Pool’, and the server ‘Defualt’.
This configuration is used to deploy the definition of the business process model to the integration server database.
Question : Why we are using the ‘Default’, and is it possible to choose another server name?
The answer is Yes, you can choose another server name (ex. DevServer), but when compiling the business model the Designer will generate a folder with the server name, so it is inconvenient to find your code inside a folder called ‘DevServer’ in the production. This is the reason behind using the ‘default’ server.
- Now its time for changing the right perspective in the Designer. To develop/modify your Business process you have to be in the ‘Process Development Perspective’, to change the perspective from the main menu Window –> open perspective –> other –> choose ‘Process Development’ from the list.
- The current perspective will be shown under the Designer main menu.

3.2 Create a new Business process
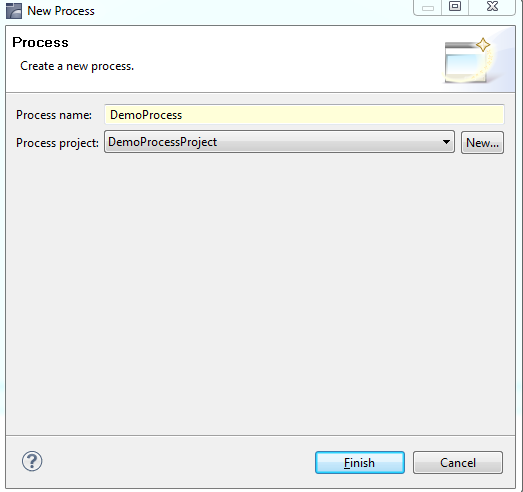
1. To create a new Process Project, from the Designer main menu : File –> New –> Process Project.
2. Choose the name of the your project (the project might contain more than a business model), we will use the project name ‘DemoProcessroject’.
3. To create a new process model, from the Designer main menu : File –> New –> Process, we will name the process as
’DemoProcess’.
4. In the properties Tab –> General, you will find the main properties of the new process :
Process name : DemoProcess
Process ID : DemoProcessProject/DemoProcess
Version : 1
The process ID is very important as it will be the unique key of this process in webmethods database and in the process engine.
3 Available components/steps in webmethods BPM.
The screenshot below show all the possible options to use to build your business process model.

The following table will describe the most used components :
|
Name |
Descrpition |
|
Pool – Pool |
Is the main layout or box which will contain all your process model activities |
|
Activities – Service Task |
A step in the process model which will call a flow service in the IS. |
|
Activities – User Task |
A step means that the process require user intervention/action in My webmethods(WM task). |
|
Activities – Send Task |
Is a step that takes a publishable document as input and publish it. Note : If publishing the document failed, you will not receive an error (may be softwareAG released a fix for this problem). However you can publish a document through a normal flow service called by ‘service task’ |
|
Activities – Receive Task |
Is the starting point of the processing or receiving response in the middle of the process. The receive task is a trigger in the Integration server. |
3.4 Design your first process
Target Example :
We want to design a process for online magazine subscription and here is the steps :
1. The process will receive the customer request.
2. we will validate the input data (customer name, credit card length).
3. Perform the payment transaction.
4. Update the customers database.
5. Send confirmation email to the customer.
6. Inform the customer with the failure if any of steps 2, or 3 failed.
Lets start designing our model :
Assumptions : we assume that you already created a publishable document in the Integration server, and you will publish it for each customer request.
1. Open the SoftwareAG designer, and create a new process project ‘DemoProcessProject’.
2. Create a new process ‘DemoProcess’.
3. Change the Designer perspective to ‘Process Development’.
4. Make sure that you are in the ‘Process Development’ mode.
![]()
5. From the Palette on the right of the page, in the new process design area drag and drop a pool.
6. A pop up window will ask you if you want to set pool type. Choose ‘Internal’

Note : You can use the external organization to show the detail internal for other systems (not a part from your process), it is only for reference. So thats why you must have at least one ‘Internal pool’ and none or multiple ‘External pool’.
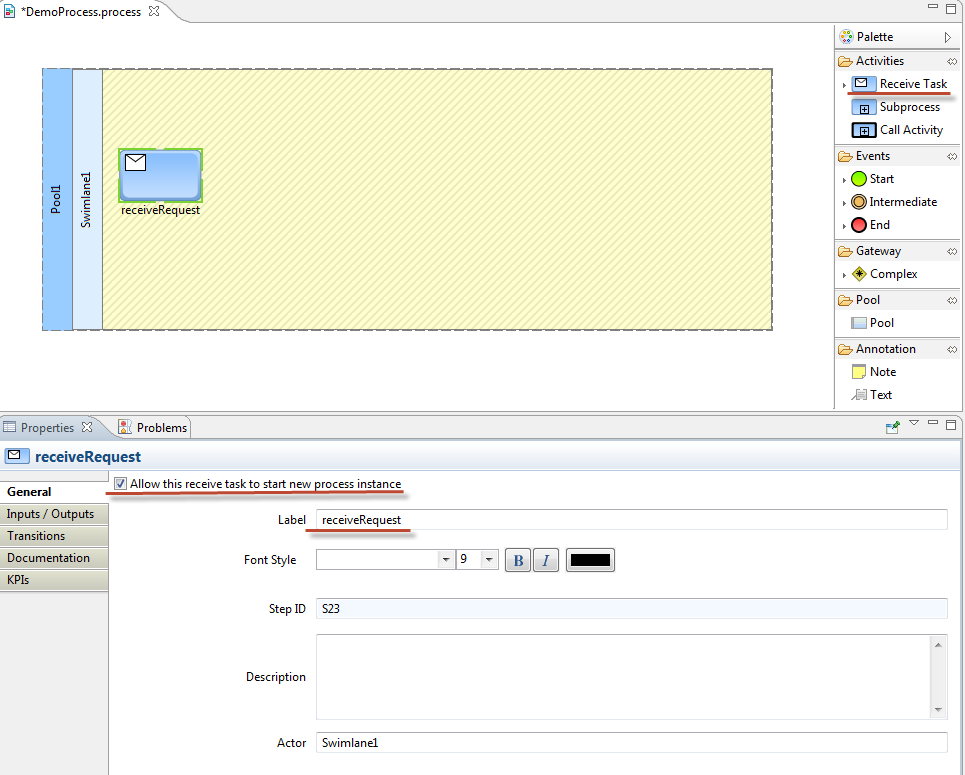
7. Drag and drop ‘Receive Task’ into the process pool, and name it ‘receiveRequest’ from the property tab.
8. Make sure that the check box ‘Allow this receive task to start new process’ in the property tab is checked (as it is the starting point of the model).
9. Here is a screenshot from the publishable document we will use.

10. Go to the properties tab –> Implementation, and chose the document you created in the last step in the ‘Receive Document’.

11. Then we will continue drawing the steps, and drag an arrow between the steps to define the sequence by dragging the arrow from a step to another.
We have created all the steps graphically, and the model will look like this :

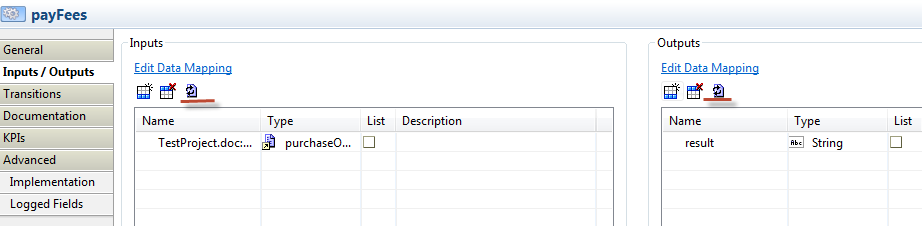
12. For each step except ‘ProcessEnd’ go to the properties tab –> Implementation, and chose the Integration server flow service to be called to implement the logic you want.
For example in the below screenshot for the step ‘payFees’ we are calling the service ‘paymentTransaction’.

13. Go to the properties tab –> Inputs / Outputs, refresh the inputs and output and you will see the input and output of the IS flow service became the input & output of the process step.
14. The step ‘InformCustomer_failed’ which is responsible to inform the customers of the problems is reachable from two steps ‘validateInput’, and ‘payFees’. So to define the conditions to execute this step click on the arrow coming from the other two steps.
In the properties tab –> condition, choose the variable that you want to use in the condition, in the example below the processing will go from the step ‘payFees’ to ‘InformCustomer_failed’ only if the value of the variable ‘result’= ‘Error’ (result is an output parameter from the step payFees).

15. We have to configure the step ‘InforCustomer_Failed’ by going to the properties tab –> Joins, then choose the type you want. In our example we will use ‘Unsynchoronized OR’.
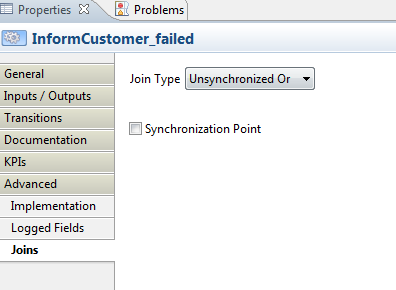
Here are the possible values of the join:
|
Value |
Meaning |
|
Unsynchoronized Or |
Execute the step if one condition from the two has been satisfied |
|
Or |
Wait till the evaluation of all conditions (on the arrows leading to the step), then start the evaluation. Usually it is used if you don’t want to continue the processing without terminating the previous steps. |
|
And |
Execute when all conditions have been satisfied. |
|
Complex |
Use complex customer logic to decide whether to execute the step or not. |
16. The end step is marking the end of the processing and it will decide the status of the process instance. For example in the below screenshot we are making the process status as ‘Completed’. (other possible value is ‘Failed’)

17. After configuring all the steps in the process model, its time for ‘Build & Upload for Execusion’ it is the button with the label ‘010’ in the below screenshot.
![]()
18. You will receive a message asking whether to enable the process or not after building it, we will choose ‘Yes’ to be able to start using the new process by publishing the subscription document to the broker.

19. The build report will confirm the status of the build as the below screenshot.

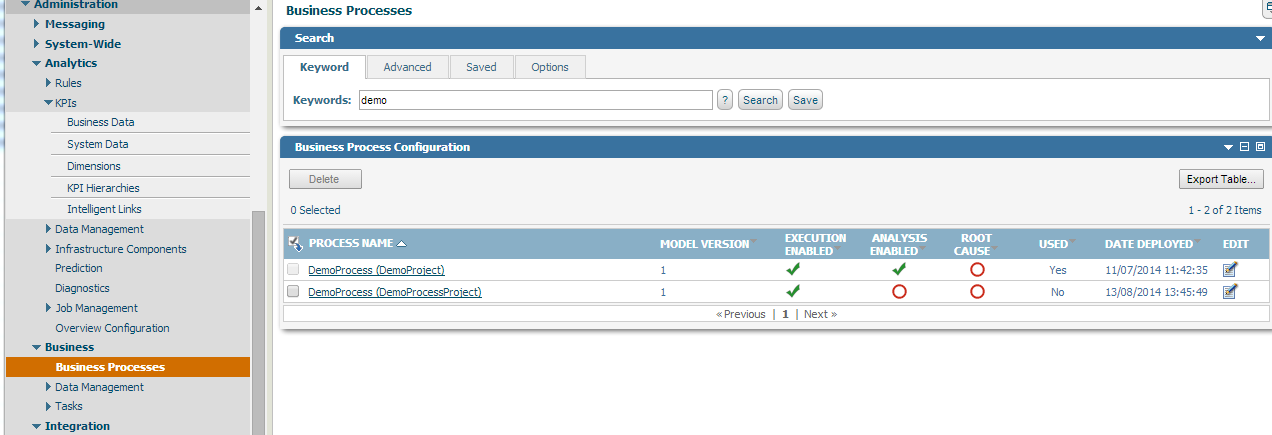
20. You can make sure that the process status is ‘Enabled’ from the MWS –> Administration –> Business –> Business Process.
To start a process instance from the model all you have to do is publishing a document and the model’s trigger will pick it up for processing. To check the running instance go to MWS –> Monitoring –> Process Instance.
Thank you for visiting our website. We are looking forward reading your comments and questions.
Follow us:
on twitter: @WM_Expert
Group on LinkedIn: webmethodsExpert.com
(C) 2014 Hossam Elsharkawy. All rights reserved.
