Webmethods Business Process Management (BPM)- Call Activity

In this tutorial we will discuss how to use the call activity in your business process. We will cover the following points:

  1. Difference between ‘Call-Activity’, and ‘Sub-process’.
  2. Example using the ‘Call Activity’.


Note: This tutorial is valid for webMethods versions 8.X to 9.X. You need to be familiar with webMethods business process familiar. 

If you are not familiar with developing a business process with webMethods, please read the article on the following link:

webMethods Business Process Management (BPM) – Getting started

1. Difference between ‘Call-Activity’, and ‘Sub-process’.

Call Activity: it a step in a business process which invoke an existing ‘callable’ business process model. The business process which uses the call activity is called ‘Parent process’, and the called process is called ‘Child process’.

‘Sub-process’: is a block/group of steps in the business process, it is used to make reading the model easier, or repeat the sub-process in a loop.

So the difference is that the ‘Call activity’ can be used in more than one model to perform a specific functionality, but ‘Sub-process’ is used inside one business process, and it can’t be used in another model because it is simply a group of steps in a model.

2. Example using ‘Call Activity’

objective: develop a business process for a bank to issue a new credit card. The process will:

  • Validate if the customer already exists in the bank system or not.
  • If the customer doesn’t have an account, the process will call another business process ‘createCustomer’ to create the user profile. The ‘CreateCustomer’ process should be available for future use by another business process.
  • The business process will send the order to issue the credit card and send it to client.

So we are going to develop two business models:

  1. Create Customer (callable business process/ child business process),
  2. Credit card request (the parent business process)

Note: We will discuss the details related to creating the callable business process, and using the call activity. We will not discuss the details of the regular steps as we already explained it in our earlier tutorials.

1. ‘CreateCustomer’ business process

This process should be callable business process and it should follow the specification of BPMN 2.0 (Business Process Model and Notation) as the use webMethods business process is deprecated (we will discuss the BPMN 2.0 specification in future tutorials).

Here is the process model:

CallAct- create Customer Model

The differences between this process model and any other regular business process(webMethods business processes) are in the start, end step, and configuring the ‘Global Process Specifications’.

The process must start with a ‘non-start event’ step (the empty green circle), and it must ends with the ‘End’ step (the empty red circle).

call activityin the palette

The start, and End steps are for marking the starting point, and end point of the model only, that’s why there is no input or output document in the implementation tab.

non start event property

The remaining steps are:

‘validateData’: is a service task to make sure that all the requires fields are present.

‘CreateCustomer’: is a service task responsible in creating the customer in the bank system, and it is called only if the validation result is ‘true’ (Valid=true).

‘PrepareOutputDoc’: is a service task which is responsible to map/construct the final output document which will be passed to parent/caller model. The join type on this step  ‘Un-Synchronized OR ’ which means it will be executed if only one of the conditions was true (Valid= true, or valid != true).

The last and important step is configuring the ‘Global Process Specifications’. Click anywhere outside of the process pool of the process and you will find the business process properties in the property tab, choose the ‘Global Process Specifications’ as per the below image.

createCustomer - global process specification

Add the document type of the input and output in the ‘Input/output specification for callable process’. This step is important for the following reasons:

a) The process engine will search for the output document type in the pipeline while terminating the process instance in the runtime to be returned to the parent/caller business process.

b) For the caller/parent business process the callable business process is like a service call and its input/output parameters are the parameters defined in the ‘Global Process Specifications’.

This model is ready, please deploy it to be able to use/call it from the parent business process in the next section.

2. ‘CreditCardRequest’ process

Which is responsible for checking if the customer is an existing customer or not. If it found that it is a new customer the process will call the callable business process ‘CreateCustomer, then it issues the credit card for the customer.

Credit card request

The process is a regular business process following the rules we discussed in our earlier tutorials. The new is the use of the call activity to call another business process ‘CreateCustomer’ as a step in the business process. From the palette choose the ‘Call Activity’.

call activityin the palette

Click on the call activity step in your model to configure the business process to be called in the ‘properties > Implementation’ tab.

call activity properties

We will choose the type ‘BPMN callable process’, and we will press the ‘…’ button to choose the business process.

Note: You have to compile/deploy the callable business process (createCustomer)to be able to choose it.

If you go to the inputs/outputs parameters of the ‘Call activity’ step you will find the parameters of the callable business process which were defined in the ‘Process Global Specifications’.

Please deploy the process after finishing the development of the other steps (validation service, choosing the subscription document for the parent process, …)

Note: In the run time you will find one instance for the parent model(CreditCardRequest), and another one for the child model (createCustomer) in myWebmethods.

We hope that you find what you are looking for in our tutorial, and we are looking forward reading your comments and questions.

Follow us:

on twitter: @WM_Expert

Group on LinkedIn: webmethodsExpert.com

(C) 2015 Hossam Elsharkawy. All rights reserved.

webMethods Flow Service Error Handling Tutorial

A couple of years ago I was withdrawing money from the bank’s ATM machine and I got a message ‘Transaction failed. please try again later!’, so I searched for another ATM machine, and I was surprised that my account balance is missing the amount i was withdrawing in the failed transaction! I don’t want to judge technically as I don’t know if there were better ways to handle this error or not, but it was not a pleasant experience as a customer.

In this tutorial we will try cover the most common ways of error handling for webMethods flow service.

We will cover the following points:

  1. Try-catch block/sequence.
  2. Try-finally block/sequence.
  3. Exception handling for the child services.

Before using any type of error handling you have to decide what is the outcome of the exception handling, for example: to inform the customer/support with the error to take action, or to log the error to investigate later, or to change the direction of the code to fix the problem. Knowing the desired system behaviour will help you choose the right exception handling method.

  1. Try-catch block

The try-catch block works the same way as Java. You execute a sequence of steps, if you faced unexpected exception/error you skip the processing and execute the catch block.

To define the Try-Catch block, follow the following steps:

  • Create a new flow service using SoftwareAG designer.
  • Create a new sequence and call it ‘Main’.
  • Create another two sequence under the ‘main’ sequence, call them, ‘Try’, and ‘catch’.
  • Go to the properties of each sequence and configure the ‘exit on’ as follows:

* ‘Success’ for the ‘Main’ sequence.
*’Failure’ for the ‘try’ sequence.
* ‘Done’ for the catch sequence.

The main sequence has the try, and Catch sequences. So by defining the ‘exit on’ parameter of for the main to ‘Success’, this means that if the first sequence (Try) finished successfully then exit the sequence ‘Main’ and the ‘Catch’ Block/sequence will not be executed.

The ‘Try’ sequence is configured to ‘exit on’ = ‘failure’, which means if one step failed, all the steps following the failed step in the ‘Try’ block will not be executed, and the code will jump to execute the ‘Catch’ block/sequence.

The ‘Catch’ block is configured to ‘exit on’ = ‘done’ which means that each step in the ‘Catch’ block must be executed regardless of the result of each step.

So let’s apply the rules on the following example:

TryCatchBlock

In the example we have childService1, and childService2 in the main ‘Try’ block. If the service childService1 generated an exception, then the service childService2 will not be executed, and we will execute the steps in the ‘Catch’ block in sequence.

In the ‘Catch’ block, we are calling two services ‘getLastError’, and ‘debugLog’ both services are developed by webMethods.

‘getLastError’: is responsible get getting the last exception generated in the flow service. It MUST be the first step in the catch block otherwise it will not return the error.

‘debuhLog’: is used to write the error in the Integration server Log.

This is  a very simple way to handle the errors, and we are assuming that we will log all the error in the Integration server log file. You might save the errors in custom database table or file, you choose the suitable way to store the errors.

2. Try-finally block.

It works the same way as Java. And we use it when we want to execute some steps before terminating the execution regardless of the result of the service. For example you want to make sure to close an open connection before terminating the service.

Here are the step to create try-finally block:

  • Create a new flow service using SoftwareAG designer.
  • Create a new sequence and call it ‘Main’
  • Create two sequences under the ‘Main’ sequence,  call them ‘try’, and ‘finally’.
  • Go to the properties of each sequence and configure the ‘exit on’ as follows:

* ‘Done’ for the ‘Main’ sequence.
* ‘Failure’ for the ‘try’ sequence.
* ‘Done’ for the ‘Finally’ sequence.


The Main will exist only when all the sub-steps(Try, Finally) are executed regardless of the status of execution (success\failure).

The ‘Try’ block will skip the processing if an exception was generated, and all the steps followed the failed step will not be executed.

The ‘Finally’: it will be executed after the execution of the ‘Try’ block/sequence regardless the result of the execution. We configure it to exit on ‘Done’ to make sure that we execute all the steps of the sequence/block.

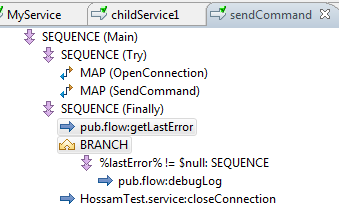
try-FinallyBlock


As you see in the above service ‘SendCommand’, the finally block is:

  • Calling the service ‘getLastService’. It MUST be the first step in the sequence.
  • We are checking if the ‘lastError’ document (the output of getLastError) is present in the pipeline or not, because to log the error happened in the ‘Try’ sequence/block if applicable. Then we call the service ‘closeConnection’ to close the opened connection in the ‘Try’ sequence regardless of the result of the transaction.


3. Exception handler for child services

Rule: the exception is caught only once. So let’s check the following example to clarify this sentence:

TryCatchBlock


In this example we have created the flow service ‘myService’, we are using Try-Catch sequence, in the try sequence/block we are calling the services ‘childService1’, and ‘childService2’.

Here is the code of ‘childService1’

childServiceWithoutexpHandling


Here is the code of ‘childService2’:

childServiceWithtExpHandling


The only difference between the two service is that ‘childService1’ is calling the publish service directly without catching the exception. In ‘ChildService2’ the publish service was called from inside Try-catch block.

Now let’s compare between the following scenarios:

case Expected Behaviour
publish failed in childService1
  • the service will exit the ‘try’ block.
  • childService2 will not be executed.
  • The catch sequence/block will be executed
publish failed in childService2
  • The exception will be caught and handled in the catch block/sequence of childService2
  • The processing of the ‘Try’ block will continue (if there were other steps after calling childService2, it will be executed).
  • The catch block/sequence of the service ‘myService’ will not be executed.
No errors in childSerivce1, or childService2
  • The ‘try’ block will be executed.
  • The ‘catch’ block will not be executed.


This was a quick idea of the most common ways to handle the errors of webMethods flow service.


Thank you for visiting our website. We are looking forward reading your comments and questions.
Follow us:

on twitter: @WM_Expert

Group on LinkedIn: webmethodsExpert.com

(C) 2015 Hossam Elsharkawy. All rights reserved.