

Objective: After reading this tutorial you should be able to configure, and start the terracota server array version 4.1 on windows, or Unix, or Linux.
The tutorial might be interesting for Administrators, developers, or architects who are: in-charge of preparing the environments, want to have a basic idea on how to design clustered Integration server solution.
Note: The configuration of Terracotta server array is not valid for versions earlier than 4.1.
Here are the points which will be discussed in this tutorial:
1. When and why to use cluster?
2. Architecture Diagram.
3. Terracotta server array as windows service Vs command-line.
4. Configure windows service config file ‘wrapper-tsa.conf’.
5. Configure Terracotta server array config file ‘tc-config.xml’
6. Start Terracotta as windows service.
7. Start Terracotta using the command line.
1. When and why to use cluster?
We use cluster to eliminate the single points of failure, maintain high availability, and failover. So if one application server failed (integration server), the other servers in the cluster will continue the processing, the clustered integration servers are working as one integration server which means they are using the same database, and they must be identical. The integration server in the cluster is working in the mode active-active NOT active-passive (meaning that both server are processing requests).
Cluster is a good idea to achieve the failover in these cases:
- Schedulers.
- Processing of business processes.
- Services invoked by triggers.
Cluster is not recommended in Integration server hosting web service only as Cluster adds overhead on the performance which will affect the response time of the web service.
Keep in mind that:
1. The processing power will reduced when an Integration server in the cluster is down.
ex. if you have 2 Integration server in the cluster, when one of them is down this means that you are working with 1/2 of your processing power.
2. The cluster is not a replacement for the load balancer in case of the web service calls.
3. The load is not divided equally over the integration servers in the cluster.
2. Architecture Diagram
In this section we will discuss 2 architecture options to install Terracotta servers.
Option 1: Install the cluster with single Terracotta

In this option the Integration server is connected to only one terracotta server. We don’t recommend this option as this server became a single point of failure.
Option 2: Install the cluster with more than Terracotta server
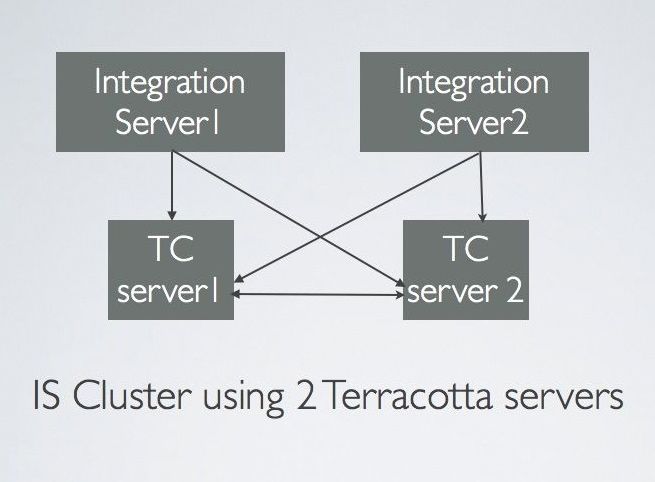
In the option we have 2 terracotta servers to avoid having it as a single point of failure. You can configure more than 2 terracotta servers if needed. We recommend this option as it is more reliable than the first option. And make sure to install the terracotta servers in two different physical machines to avoid the single point of failure due to the unavailability of the physical machine.
3. Terracotta server array as windows service Vs command-line
If you are using windows you can run Terracotta server as windows service or using the command-line. To manage the terracotta easily it is strongly recommended to use windows service.
If you are using Linux or Unix you can start the terracotta server array from the command-line and send it in background otherwise it will be turned-off when closing the session.
Here are the steps to configure and start Terracotta 4.1 as Windows Service:
- Install Terracotta server array 4.1 using SoftwareAG Installer and your empower account or installation image.
- Copy the license file to the Terracotta installation directory (by default it should be copied to the folder ‘softwareAG_Dir\Terracotta\’ the file name is ‘Terracotta-license.key’)
- Configure the windows service configuration file ‘wrapper-tsa.conf’.
- Configure the terracotta server array configuration file ‘tc-config.xml’.
- Create the windows service using the command line.
- Start the terracotta server array using the windows service.
Here are the steps to configure and start Terracotta 4.1 from command-line:
- Install Terracotta server array 4.1 using SoftwareAG Installer and your empower account or installation image.
- Copy the license file to the Terracotta installation directory (by default it should be copied to the folder ‘softwareAG_Dir\Terracotta\’ the file name is ‘Terracotta-license.key’)
- Configure the terracotta server array configuration file ‘tc-config.xml’.
- Start the terracotta server array using the command-line.
4. Configure windows service config file ‘wrapper-tsa.conf’
Please click on the link below to see a sample file for the windows service configuration file ‘wrapper-tsa.conf’.
Please make sure to change or verify the following parameters in the file:
- the working directory which contains data of terracotta server
wrapper.working.dir=c:\SoftwareAg\Terracotta\server\wrapper\work
- java home directory: it is strongly recommended to use the jvm which comes with the teracotta installation
set.JAVA_HOME=c:\ SoftwareAg\jvm\jvm
* The license key file location
wrapper.java.additional.2=-Dcom.tc.productkey.path=c:\SoftwareAg\Terracotta\Terracotta-license.key
* Initial Java Heap Size (in MB)
wrapper.java.initmemory=1024
* Maximum Java Heap Size (in MB)
wrapper.java.maxmemory=1024
* set the name of the TC server you want to start, found in conf/tc-config.xml
set.SERVER_NAME=TcServer1
* the location of the tc-conf.xml file
wrapper.app.parameter.4=c:\SoftwareAg\Terracotta\server\wrapper\conf\tc-config.xml
wrapper.app.parameter.11=c:\SoftwareAg\Terracotta\server\wrapper\conf\tc-config.xml
* Display name of the windows service
wrapper.ntservice.displayname=Terracotta 4.1 Server1
# Description of the windows service
wrapper.ntservice.description=Terracotta 4.1 Server1
Note: you can take a copy from the sample config file, modify it with your values of your environment, and make sure that the name of the file wrapper-tsa.conf.
5. Configure Terracotta server array config file ‘tc-config.xml’
Here is a sample xml you can copy it, modify it, and save the file name as tc-config.xml to use it as your config file:
<?xml version=”1.0″ encoding=”UTF-8″ ?>
<tc:tc-config xmlns:tc=”http://www.terracotta.org/config“
xmlns:xsi=”http://www.w3.org/2001/XMLSchema-instance“
xsi:schemaLocation=”http://www.terracotta.org/schema/terracotta-9.xsd“>
<servers>
<!– host: the host name, name: must be the same as the SERVER_NAME in conf\wrapper-tsa.conf –>
<server host=”server1″ name=”TcServer1″>
<!– Specify the path where the server should store its data. –>
<data>c:\SoftwareAg\Terracotta\server\wrapper\work\terracotta\data</data>
<!– Specify the port where the server should listen for client traffic. –>
<tsa-port>9510</tsa-port>
<jmx-port>9520</jmx-port>
<tsa-group-port>9530</tsa-group-port>
<!– Enable BigMemory on the server. –>
<offheap>
<enabled>true</enabled>
<maxDataSize>2g</maxDataSize>
</offheap>
</server>
<server host=”server2″ name=”TcServer2″>
<!– Specify the path where the server should store its data. –> <data>c:\SoftwareAg\Terracotta\server\wrapper\work\terracotta\data</data>
<!– Specify the port where the server should listen for client traffic. –>
<tsa-port>9510</tsa-port>
<jmx-port>9520</jmx-port>
<tsa-group-port>9530</tsa-group-port>
<!– Enable BigMemory on the server. –>
<offheap>
<enabled>true</enabled>
<maxDataSize>2g</maxDataSize>
</offheap>
</server>
<!– Add the restartable element for Fast Restartability (optional). –>
<update-check>
<enabled>false</enabled>
</update-check>
<restartable enabled=”true”/>
<client-reconnect-window>120</client-reconnect-window>
</servers>
<clients>
<logs>logs-%i</logs>
</clients>
</tc:tc-config>
6. Start Terracotta as windows service
After configuring the ‘wrapper-tsa.conf’, and ‘tc-config’ we will create the windows service by running the following command in the command-line:
c:\Terracotta_install_dir\Terracotta\server\wrapper\bin\wrapper-windows-x86-64 <command> <wrapper-tsa.conf file>
<command>:
-i : install windows service
-r : remove windows service
Example :
To install the windows service:
wrapper-windows-x86-64 -i c:\SoftwareAg\Terracotta\server\wrapper\conf\wrapper-tsa.conf
To remove the windows service:
wrapper-windows-x86-64 -r c:\SoftwareAg\Terracotta\server\wrapper\conf\wrapper-tsa.conf
Note: If you made any changes in the wrapper-tsa.conf you will have to remove the windows service and recreate it so the changes will take effect. And choose the right script for your server, in this example we used the script for 64bit processor.
7. Start Terracotta using the command line
After configuring the tc-config.xml, you can use the following command to start the terracotta server array:
SoftwareAg\Terracotta\server\bin\start-tc-server -f <tc-config.xml configuration file> -n <terracotta server name>
<terracotta server name>: is the name of the teracotta server which we are going to start using the command-line, it must be one of the servers defined in the config file ‘tc-config.xml’
Example:
start-tc-server -f c:\SoftwareAg\Terracotta\conf\tc-config.xml -n TcServer1
In Unix/Linux run the command in background as follows:
nohup start-tc-server -f c:\SoftwareAg\Terracotta\conf\tc-config.xml -n TcServer1 &
At the end I would like to thank my friend Bassem Elsodany for helping me on this tutorial.
Thank you for visiting our website. We are looking forward reading your comments and questions.
Follow us:
on twitter: @WM_Expert
Group on LinkedIn: webmethodsExpert.com
(C) 2015 Hossam Elsharkawy. All rights reserved.
