Today we will see how to create CSR (certificate signing request), generate the self-signed certificate.
The security certificate is a file used to identify the identity of the server. The certificate contains information like the server name/IP, the certificate serial number, expiration date, and public key.
If you are not familiar with the security certificate and how it is used, it is strongly recommended to read our last article (Secure Connection – Part 1).
In this tutorial we will use OpenSSL to generate the certificate, you can download it from the internet, it is open source tool.
1. Open the command line and go to the bin directory of OpenSSL
Ex. C:\OpenSSL-Win32\bin\
2. Set the configuration file of the openSSL by the following command :
set OPENSSL_CONF=C:\OpenSSL-Win32\bin\openssl.cfg
Note : search for your config file in the openSSL directory. This step might not be necessary if the application config file is already configured.
3. Generate the private key of your server using the following command
openssl genrsa -aes256 -out server.key 1024
aes256 : is the encryption algorithm used to encrypt your private key files.
server.key : Is the file name which contains the private key.
1024 : The key length
Note : Don’t share your private key with anyone or entites including the CA. The CA doesn’t need your prviate key to issue the certificate.
Note : you will be asked to choose password for your private key file(will be used to encrypt the file). The file will be generated in the bin directory of the openSSL.
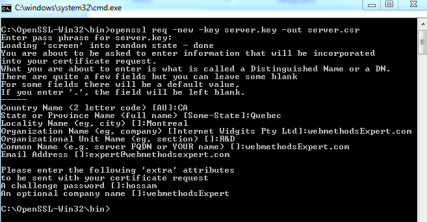
4. In this step we will genrate the CSR (certificate signing request) file to sen it to the CA (certification authority).
Here is the openSSL command :
openssl req -new -key server.key -out server.csr
server.key : The file which contain the private key of your server (from step 3)
server.csr : The file name to be generated with the CSR (certificate signing request)
You will have to answer the following questions to be included in the CSR file.
- The private key file password (will not be included in the CSR file).
- Country name (Only the initial. Example ‘CA’ for ‘Canada’)
- State or Province.
- Locality name (city).
- Organization name (ex. company)
- Organization unit name (department)
- Common name (server name) : this is the name or IP of your server. It must 100% match the server or IP used by the client or the calling servers. Example localhost and 127.0.0.1 is refering to the same server but from the certificate point of view they are not the same.
- Email address of the contact person (certificate requestor).
- A challenge password, and optional company name.
After entering the information you will find your .CSR file in the bin directory of the open SSL.
5. You have to decide which type of certificate your want :
- Certification signed by a CA (Certification Authority) – usually all the production server must be using this type.
So your next step will be sending the .CSR file to the CA. The CA will verify all the information in the CSR file to make sure that the requestor is a trusted company, then they will issue a signed security certificate, and send it to you. This is the end of the tutorial for the certificate signed by CA.
- Self-signed certificate : which means that you will be generating the certificate without CA – usually it is used in development and testing servers.
Note : The rest of the tutorial is related to the self-signed certificate.
6. Generate the self-signed certificate by executing the following command :
openssl x509 -req -sha256 -days 365 -in server.csr -signkey server.key -out server.crt
sha256 : The hash algorithm that will be used to sign the certificate.
365 : The validty of the generated certificate in days.
server.csr : The certificate sigining request which contains all the server, and the requestor orgainzation info.
server.key : The private key of your server which will be used to sign the certificate.
server.crt : The certificate file name generated after the command execution.
Note : Theoritcally in the CA uses a command like this but they will their private key to sign the certificate(server.key in our case).
Your self-signed certificate has been generated in the bin directory of the openSSL. In windows you can double click the server.crt to view the certificate information.
Thank you for visiting our website. We are looking forward reading your comments and questions.
Follow us:
on twitter: @WM_Expert
Group on LinkedIn: webmethodsExpert.com
(C) 2014 Hossam Elsharkawy. All rights reserved.


Very helpful……:)